Managing water in your yard isn't glamorous. But it's the difference between a healthy landscape and a soggy mess that breeds mosquitoes and foundation problems. A residential swale might be the simplest solution you've never heard of—a shallow, grass-lined channel that guides water where you want it to go. No pipes, no gravel, just smart grading and the right plants. If you're tired of standing water after every storm or watching erosion carve paths through your lawn, understanding how swales work can save you thousands compared to more complex drainage systems.
What Is a Residential Swale and How Does It Work
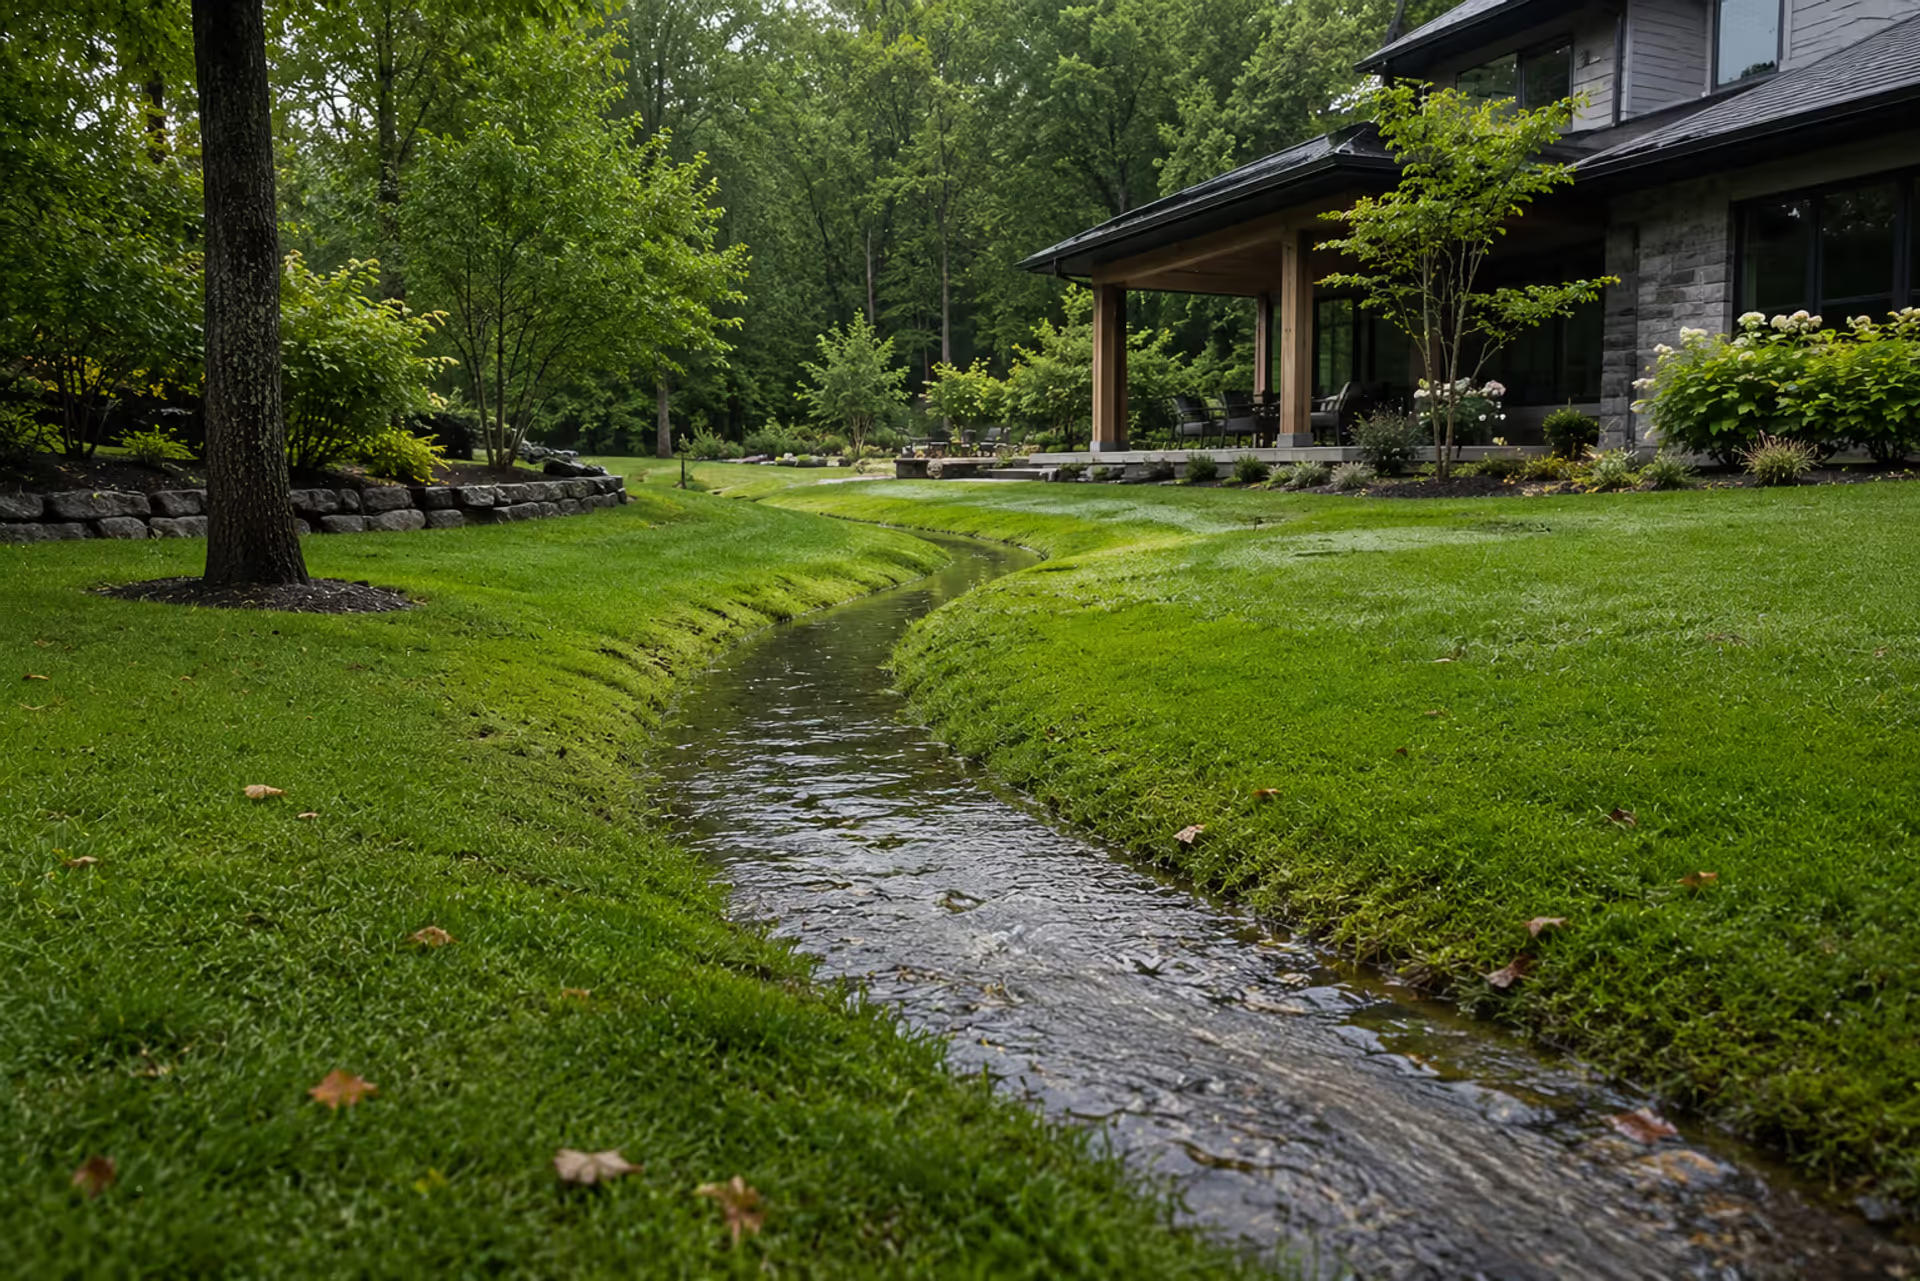
A residential swale is a shallow drainage channel designed to slow down and direct stormwater runoff across your property. Think of it as a gentle, vegetated ditch that follows the natural contours of your yard.
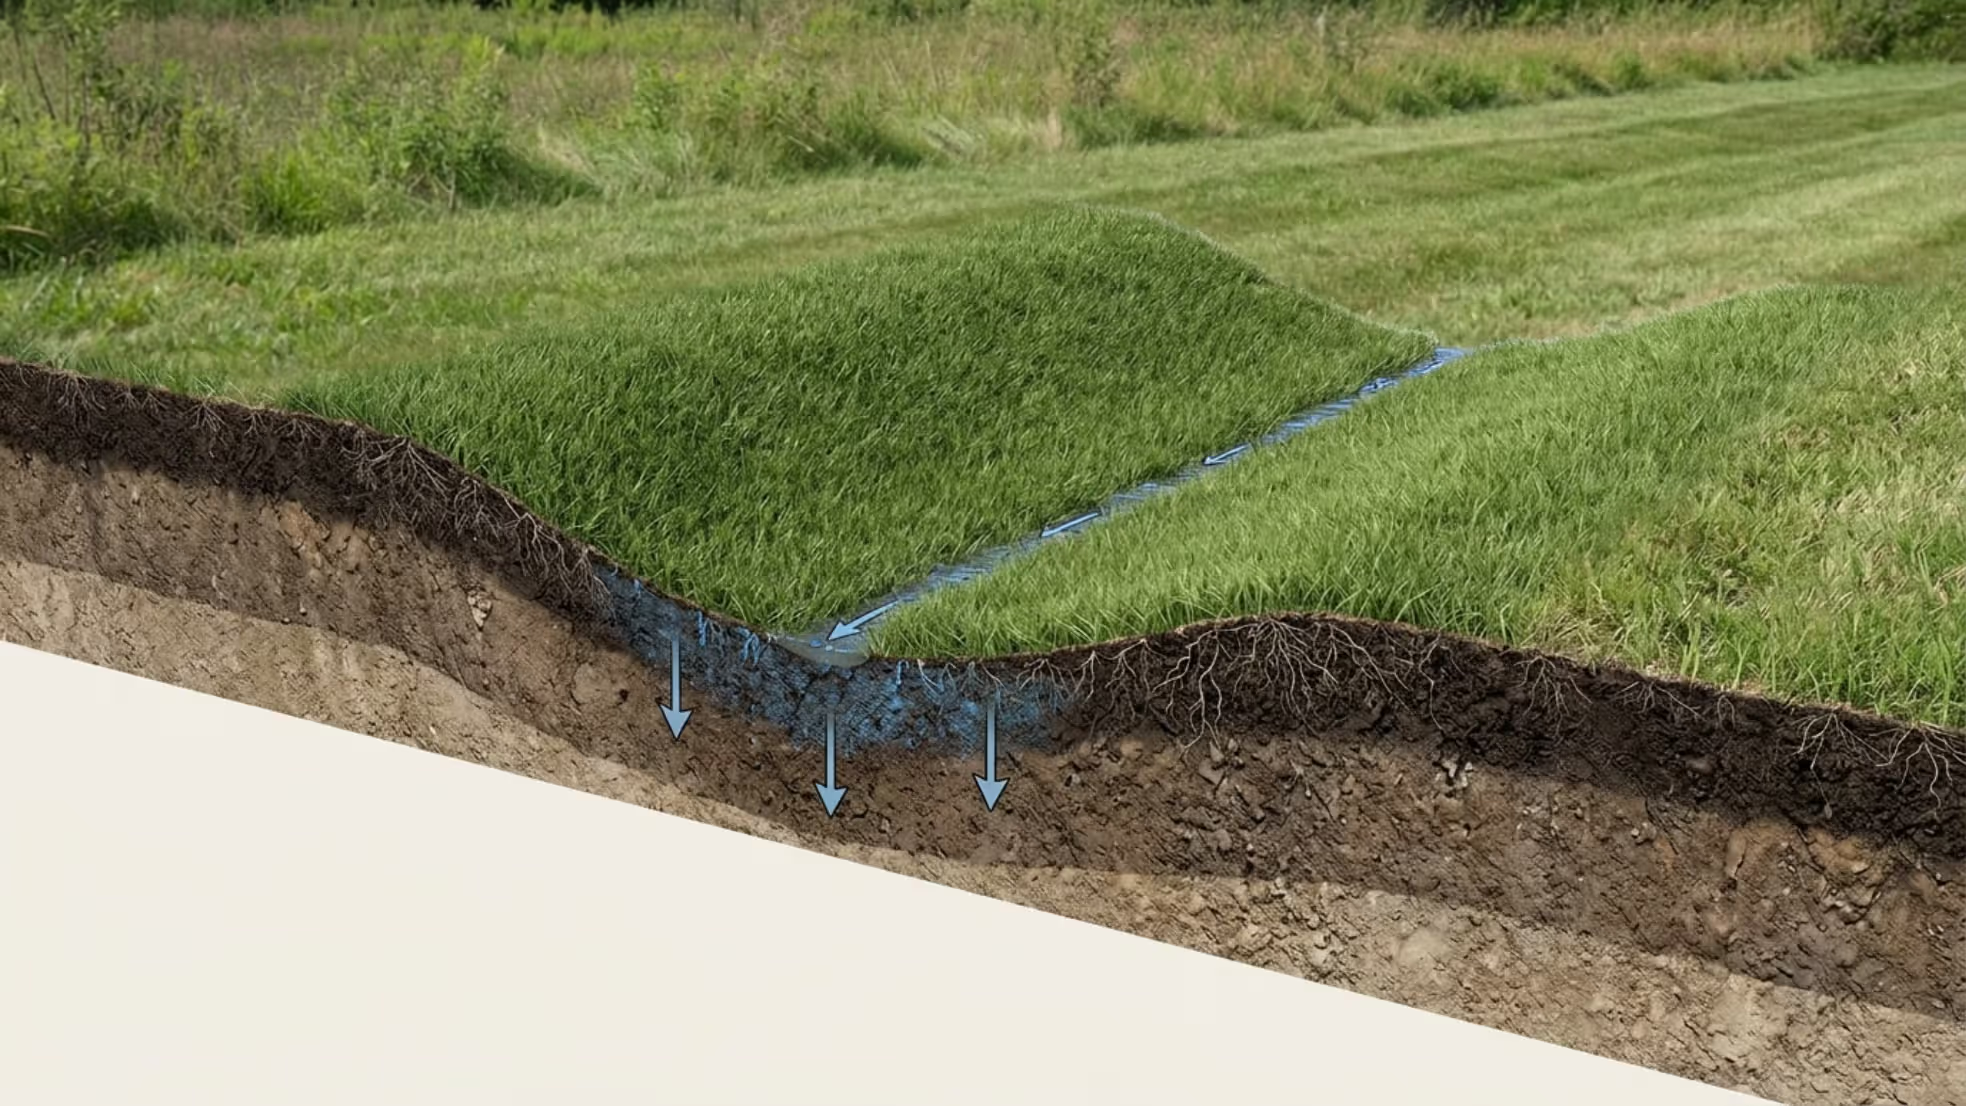
The mechanics are straightforward. Water flows into the swale during rain events, and the shallow depression guides it along a predetermined path. As water moves through the channel, it slows down considerably—that's the whole point. This slower movement allows water to soak into the ground rather than rushing off your property, carrying topsoil and pollutants with it.
Swales work through three simultaneous processes: conveyance, infiltration, and filtration. The graded channel conveys water away from problem areas. The vegetated bottom and sides absorb a portion of that water into the soil. And the grass or plants filter out sediments and contaminants before the water reaches storm drains or natural waterways.
Most residential swales handle rainwater management for roof runoff, driveway drainage, or areas where water naturally collects. They're particularly effective on properties with gentle slopes where you need to move water horizontally across the yard rather than quickly off the property.
The pattern I see most often is homeowners using swales to redirect water from high points near the house to lower areas at the property edge, where it can safely disperse or connect to municipal drainage systems.
Unlike underground drainage systems, this shallow drainage channel remains visible and becomes part of your landscape design. Done right, it looks intentional—like a purposeful landscape feature rather than a drainage fix.
Author: Sienna Calder;
Source: cribbslandscaping.com
Common Swale Shapes and Grading Requirements
Swale design comes down to two basic profiles: parabolic and trapezoidal. The parabolic shape features smooth, rounded sides that create a bowl-like cross-section. It's gentler, easier to mow, and looks more natural. The trapezoidal profile has a flat bottom with angled sides, like a very shallow ditch with sloped banks.
For residential applications, parabolic wins most of the time. It integrates better with lawn areas, and the curved sides resist erosion better than sharp angles.
The grass swale shape you choose affects maintenance and function. Wider, shallower profiles spread water out more, increasing infiltration. Narrower, deeper channels move water faster but offer less absorption.
Recommended Depth and Width Dimensions
A typical yard swale depth guide starts with this baseline: 4 to 8 inches deep for most residential applications. That's measured from the surrounding grade to the lowest point in the channel.
Deeper isn't always better. Beyond 12 inches, you're creating a feature that's difficult to mow and starts to look like a ditch rather than a landscape element. Shallower than 4 inches, and you won't move enough water during heavy rain.
Width varies more based on your specific drainage needs, but most residential swales range from 3 to 8 feet wide. The width-to-depth ratio matters—aim for at least 4:1. So a 6-inch-deep swale should be at least 24 inches wide at the bottom.
Here's a common mistake: making the swale too narrow and deep. It concentrates flow, increases velocity, and causes erosion. You want water to spread out and slow down.
Proper Slope and Grading Specifications
Lawn swale grading requires precision. Too steep, and water rushes through without infiltrating. Too flat, and water sits stagnly or doesn't move at all.
The ideal longitudinal slope (the grade along the length of the swale) ranges from 1% to 5%. That translates to a drop of 1 to 5 feet for every 100 feet of length.
At 1% slope, water moves slowly, maximizing infiltration time. This works well when you have the space and want maximum absorption. At 5% slope, water moves more quickly—necessary when you need to convey larger volumes or have limited space. Beyond 5%, you'll need erosion control measures like check dams or different vegetation.
The side slopes (the banks) should be gentle—typically 3:1 or flatter. That means for every 1 foot of vertical rise, you extend 3 feet horizontally. This makes mowing possible and reduces erosion risk.
Can you work with less than 1% slope? Sometimes. But water movement becomes unreliable, and you risk creating a wet, muddy strip rather than a functional drainage feature.
Swale vs French Drain: Which Solution Is Right for Your Yard
Both systems move water, but they work differently and suit different situations. Understanding the swale vs french drain comparison helps you choose the right yard water drainage solutions for your specific problem.
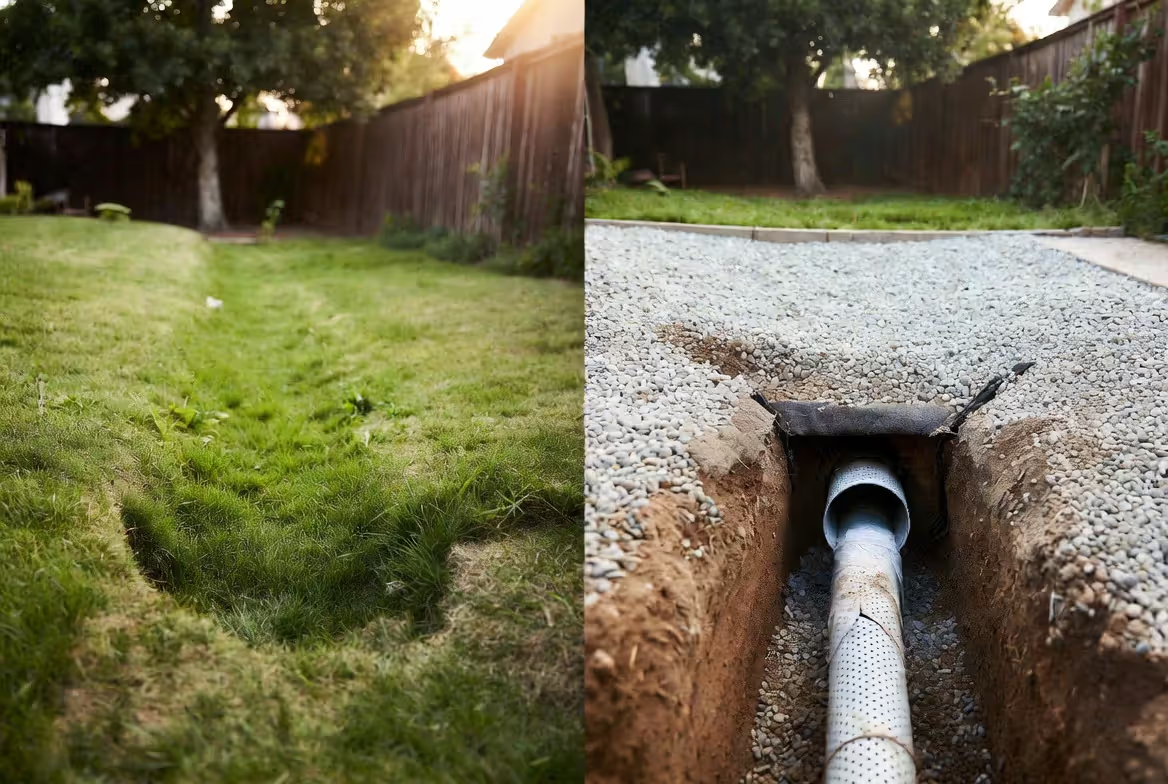
A French drain consists of a perforated pipe buried in a gravel-filled trench. Water enters through the gravel, flows into the pipe, and gets carried away underground. It's invisible once installed and works entirely below the surface.
Swales stay on the surface, using grade and vegetation to manage water. They're visible, require more space, and depend on healthy plant growth to function optimally.
Large areas with gentle slopes; rainwater management and filtration
Point drainage problems; areas with high water table; tight spaces
Aesthetic drainage in visible areas; intermittent flow
Author: Sienna Calder;
Source: cribbslandscaping.com
Soil conditions drive many decisions. French drains excel in heavy clay soils where surface infiltration is slow. The gravel and pipe bypass the clay layer and move water to a better discharge point. Swales work better in loamy or sandy soils where infiltration happens readily.
Space matters too. A functional swale needs width—typically 3 to 8 feet. French drains work in narrow areas along foundations, fences, or property lines where you can't spare the surface space.
Budget-wise, swales win for DIY homeowners. You're moving dirt and planting grass. French drains require trenching, gravel, pipe, and often professional installation to ensure proper grade and connection points.
But here's where French drains pull ahead: capacity and reliability. A 4-inch perforated pipe in gravel can handle significant water volume quickly and consistently, regardless of vegetation health or seasonal conditions. Swales depend on established grass and can become overwhelmed during extreme rain events.
The simpler option usually wins here—if a swale can solve your problem, it's cheaper and more sustainable. If you're dealing with serious groundwater issues, foundation drainage, or limited space, you'll need the underground approach.
Bioswales and vegetated drainage channels provide dual benefits that hardscape solutions simply can't match. They manage stormwater volume while simultaneously filtering pollutants, reducing thermal loading, and creating habitat corridors. In residential applications, a properly designed swale can infiltrate 60 to 80 percent of annual rainfall on-site, dramatically reducing the burden on municipal storm systems.
— Chen Michael
Designing a Yard Drainage Swale
Effective yard drainage swale design starts with observation, not excavation. You need to understand how water currently moves across your property before you redirect it.
Walk your yard during and immediately after a heavy rain. Note where water collects, which direction it flows, and where it exits your property. Take photos. These observations reveal the natural drainage patterns you'll work with or against.
Identify your problem areas: standing water near the foundation, erosion gullies, soggy spots where grass won't grow, or water flowing onto your property from neighboring lots. Your swale should intercept water before it reaches these areas and redirect it to an appropriate discharge point.
That discharge point is critical. You can't just move water to your neighbor's yard—that creates legal issues and doesn't solve the underlying problem. Acceptable discharge locations include:
Municipal storm drains or street gutters
Natural drainage easements
Rain gardens or retention areas on your property
Dry wells or infiltration basins (where soil permits)
Measure the distance from your problem area to the discharge point. This determines the swale length and helps calculate the required slope.
Sizing depends on your drainage area and expected rainfall intensity. A rough guideline: for every 1,000 square feet of impervious surface (roof, driveway, patio) draining into the swale, you need approximately 50 to 100 square feet of swale surface area. This varies based on soil infiltration rates and local rainfall patterns.
For swale for rainwater management in most residential settings, a channel 4 to 6 inches deep and 4 to 6 feet wide handles typical roof and yard runoff effectively. If you're managing drainage from multiple sources or large impervious areas, scale up accordingly.
Vegetation selection matters more than most homeowners realize. Standard lawn grass works, but deep-rooted varieties perform better. Tall fescue tolerates both wet and dry conditions well. Native grasses like switchgrass or prairie dropseed offer excellent erosion resistance and deeper infiltration.
Avoid shallow-rooted species that create a dense mat without penetrating the soil—they'll float up during heavy flows or create a slick surface that water slides over rather than through.
The swale should integrate naturally with your existing landscape. Gentle curves look better and function better than straight lines or sharp angles. Curves also slow water velocity and increase infiltration time.
Step-by-Step Swale Installation Process
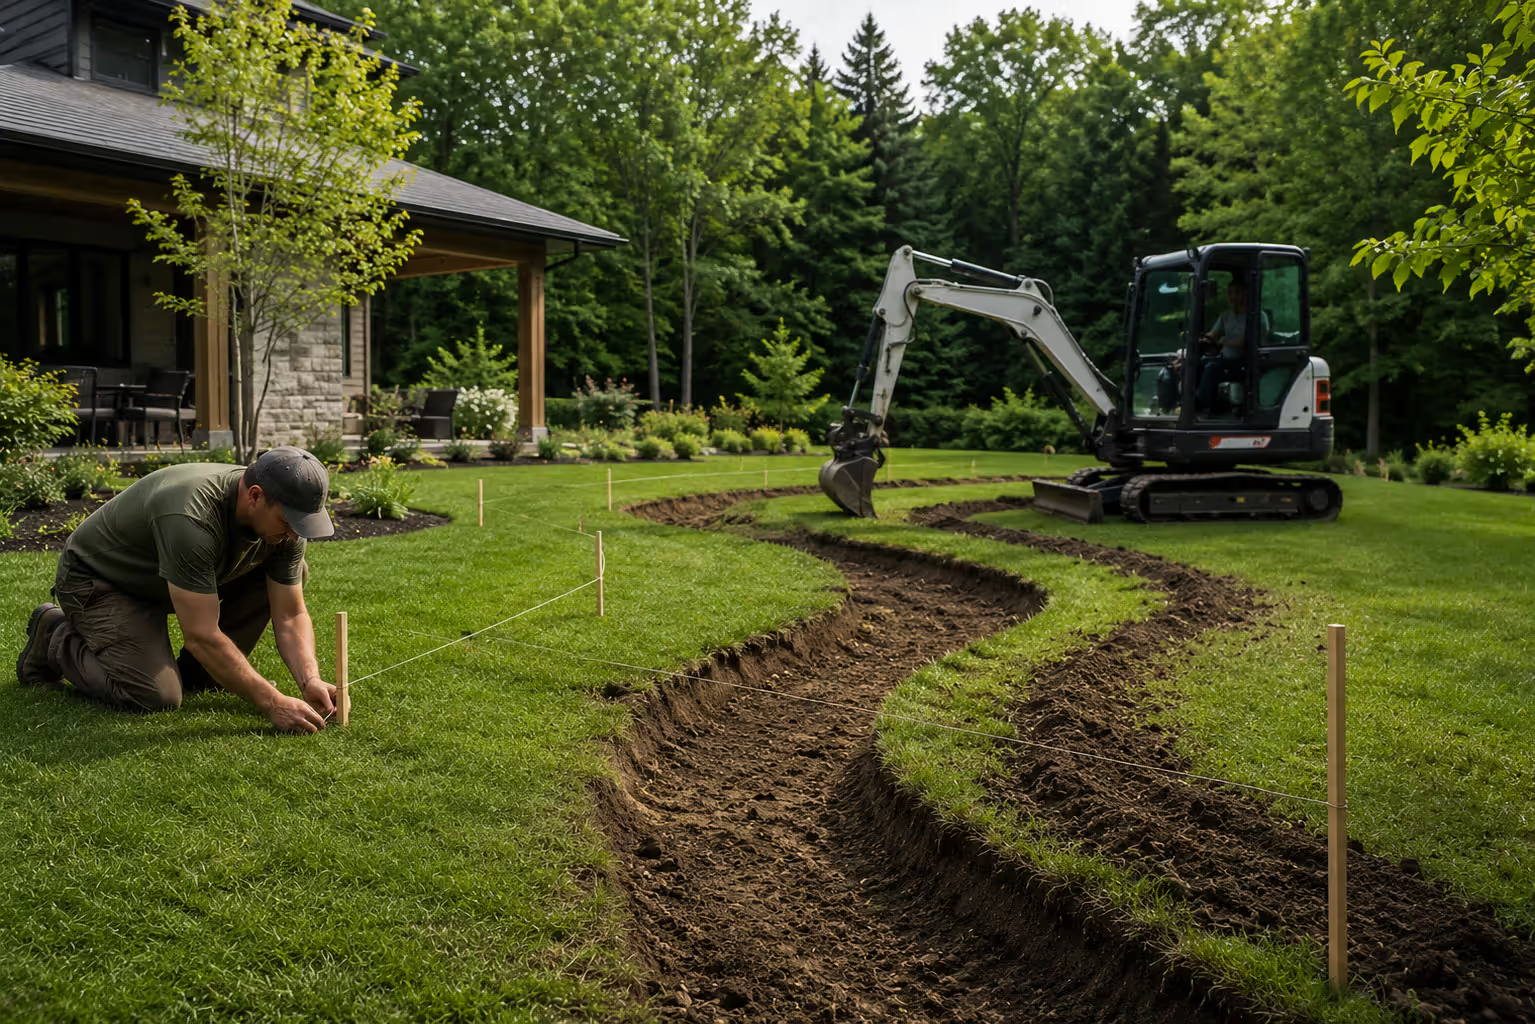
Layout comes first. Use stakes and string or spray paint to mark the centerline of your swale from the starting point to the discharge location. Mark the edges to indicate the full width.
Check your layout for consistent grade. A 4-foot level on a straight board or a laser level helps verify slope. You're aiming for that 1% to 5% gradient along the entire length.
Here's a common mistake: assuming your yard has consistent slope. It doesn't. You'll likely need to adjust depths as you go to maintain proper grade.
Excavation starts at the discharge end and works uphill. This lets you verify that water will flow correctly as you dig. Remove sod carefully if you want to reuse it elsewhere—healthy sod is valuable.
Dig to your target depth, creating the parabolic or trapezoidal profile as you go. A flat shovel works well for shaping the bottom. Use a garden rake to smooth and refine the shape.
The excavated soil becomes your side berms. Spread it evenly along both sides of the swale, creating a gentle transition from the channel bottom to the surrounding grade. Tamp these berms lightly—they'll settle over time, but you don't want them washing away immediately.
Check grade frequently during excavation. A slight dip or rise can create a low spot where water ponds. These become problem areas that collect sediment and kill vegetation.
Soil amendments improve function. If you've exposed compacted subsoil during excavation, loosen it with a garden fork and work in 1 to 2 inches of compost. This enhances infiltration without compromising the channel shape.
For lawn swale grading that matches your existing yard, you want the transition zones (where the swale meets the surrounding lawn) to be gradual and smooth. A 3:1 or 4:1 slope ratio makes these areas mowable and natural-looking.
Grass or plant selection follows excavation. Seed works well and costs less, but takes time to establish. Sod provides instant erosion protection but costs more. For most residential swales, a quality turf-type tall fescue seed mix offers the best balance of establishment speed, erosion resistance, and cost.
Author: Sienna Calder;
Source: cribbslandscaping.com
Seed at double the recommended rate for normal lawn areas. You need dense coverage quickly to prevent erosion during the establishment period.
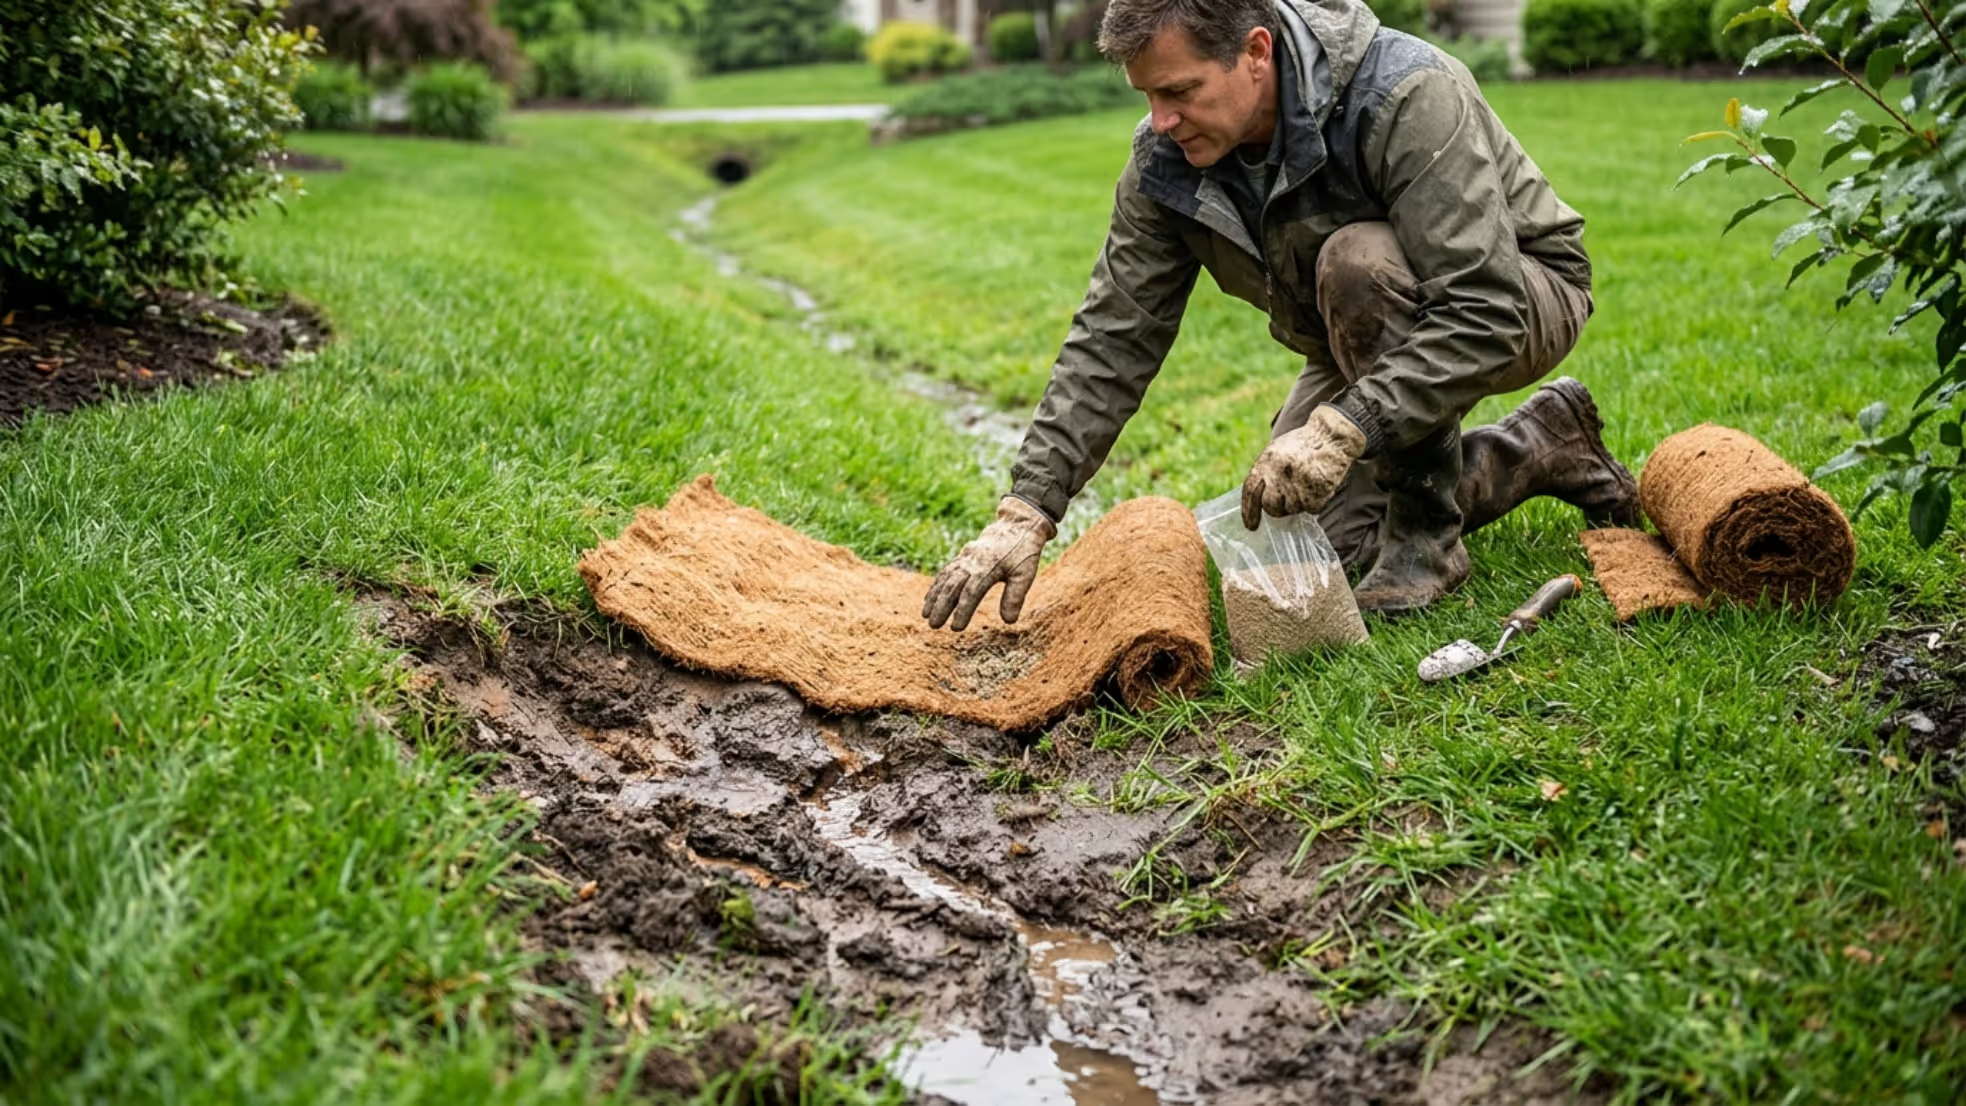
Erosion control during establishment is critical. A newly seeded swale can wash out during the first heavy rain. Use erosion control blankets (biodegradable mesh made from straw or coconut fiber) to hold soil and seed in place. Pin them down securely with landscape staples.
Water the seeded area lightly and frequently until germination occurs—usually 7 to 14 days depending on temperature and grass species. Once grass reaches 3 inches, reduce watering frequency but increase duration to encourage deep root growth.
Don't allow foot traffic or water flow through the swale until grass is well established—typically 6 to 8 weeks after seeding.
Maintenance and Common Problems
A functional swale needs attention, but not much. Seasonal upkeep keeps it working efficiently.
Mow the swale just like the rest of your lawn, but avoid scalping. Keep grass height at 3 to 4 inches—taller grass slows water more effectively and develops deeper roots that improve infiltration.
Inspect after heavy rain events. Look for:
Erosion channels forming in the bottom or sides
Sediment deposits that change the grade
Areas where grass has died or thinned
Standing water that doesn't drain within 24 hours
Erosion repair should happen immediately. Small rills become gullies fast. Fill eroded areas with topsoil, compact lightly, reseed, and cover with erosion blanket.
Sediment removal becomes necessary over time. Soil, leaves, and organic debris wash into the swale and gradually raise the bottom, reducing capacity and changing the grade. Every 2 to 3 years, remove accumulated sediment with a flat shovel, restore the original profile, and reseed if needed.
Vegetation management goes beyond mowing. Weeds and invasive plants can outcompete your chosen grass, especially in areas that stay wet. Spot-treat weeds carefully—herbicide runoff through a swale defeats its filtration purpose.
If grass struggles in consistently wet zones, consider switching to wetland-tolerant plants like sedges or rushes in those specific areas. Don't fight the conditions; adapt to them.
Signs of failure include:
Water ponding for more than 24 hours after rain
Erosion that returns quickly after repairs
Grass dying in large sections
Water bypassing the swale and following old drainage patterns
Author: Sienna Calder;
Source: cribbslandscaping.com
These usually indicate design problems: insufficient slope, inadequate capacity, or a discharge point that's not functioning. Sometimes you need to redesign rather than just repair.
One issue I see frequently: trees or shrubs planted too close to the swale. Roots invade the channel, creating uneven grade and flow disruptions. Keep woody plants at least 5 feet from the swale centerline.
FAQ: Residential Swale Questions Answered
How deep should a residential swale be?
Most residential swales function best at 4 to 8 inches deep, measured from the surrounding grade to the lowest point in the channel. This depth moves water effectively while remaining easy to maintain and mow. Deeper swales (up to 12 inches) may be necessary for higher water volumes, but anything beyond that starts to look like a ditch and becomes difficult to integrate with your landscape. Shallower than 4 inches often lacks the capacity to handle typical storm runoff.
Can I install a swale on a flat yard?
Installing a functional swale on a truly flat yard is challenging but sometimes possible. You need at least 0.5% to 1% slope for water to move reliably—that's about 6 inches of drop over 100 feet. On flatter properties, you can create the necessary grade by building up the sides of the swale with the excavated soil, effectively raising the surrounding grade while lowering the channel. This creates an artificial slope that allows drainage. For completely flat areas with no way to create grade, a French drain or rain garden might work better than a traditional swale.
What type of grass works best in a swale?
Tall fescue varieties perform exceptionally well in swales because they tolerate both wet and dry conditions and develop deep root systems that resist erosion. Turf-type tall fescue blends designed for athletic fields offer excellent durability. In consistently wet areas of the swale, consider native sedges or rushes that thrive in saturated conditions. Avoid Kentucky bluegrass or fine fescues—their shallow roots don't provide adequate erosion protection, and they struggle with the alternating wet-dry cycles that swales experience.
How long does it take for a swale to start working effectively?
A newly installed swale begins moving water immediately—the grading and shape provide that function from day one. However, full effectiveness takes 6 to 8 weeks as grass establishes and roots penetrate the soil. During this establishment period, use erosion control measures and limit flow through the swale when possible. Once grass is fully established and roots reach 4 to 6 inches deep, the swale's infiltration capacity and erosion resistance improve dramatically. Maximum function typically occurs in the second growing season after installation when root systems have fully developed.
Do I need a permit to install a swale?
Permit requirements vary significantly by location. Many municipalities don't require permits for simple residential swales that manage on-site drainage and don't alter natural waterways or drainage easements. However, you may need permits if your swale will discharge into municipal storm systems, crosses property lines, affects wetlands or floodplains, or involves significant grading (typically defined as moving more than 50 cubic yards of soil). Always check with your local building department and homeowners association before starting. Some areas also restrict how you can direct water off your property, making the discharge point a potential permitting issue even if the swale itself isn't regulated.
How much does it cost to install a residential swale?
DIY installation of a typical residential swale (50 to 100 feet long, 4 to 6 feet wide) costs $300 to $800 for materials including grass seed, erosion control blankets, soil amendments, and equipment rental. Professional installation runs $1,200 to $3,500 depending on length, complexity, site conditions, and regional labor rates. Costs increase significantly if you need extensive grading, soil removal, or connection to existing drainage systems. The main expense for DIY projects is usually equipment rental for excavation—a small excavator or skid steer makes the job much faster than hand digging for swales longer than 30 feet.
A residential swale isn't just a drainage fix—it's a way to work with water instead of fighting it. You're using gravity, vegetation, and smart grading to solve problems that would otherwise require pumps, pipes, and ongoing maintenance costs.
The best swales disappear into the landscape. Visitors don't notice them as drainage features; they just see a healthy, well-designed yard. That's the goal: function that looks intentional.
Start small if you're unsure. A 20-foot test section lets you verify grade, test vegetation choices, and see how water behaves during different rain intensities. You can always extend it once you've confirmed the design works.
And remember that swales aren't the answer for every drainage problem. Sometimes you need that French drain or a combination approach. But for many residential situations—especially when you have space, moderate slopes, and decent soil—a simple grass-lined channel moves water beautifully and costs a fraction of underground alternatives.
Your yard's drainage problems won't fix themselves. But with a weekend of work and a few hundred dollars in materials, you can create a system that handles rainwater naturally and keeps working for decades with minimal attention. That's hard to beat.
Discover practical exterior walkout basement ideas including patio layouts, landscaping solutions, and drainage strategies. Learn how to turn your below-grade outdoor space into a functional, attractive area with expert tips on materials, plantings, and design.
Transform your rooftop into a functional outdoor living space. Learn about structural requirements, weight limits, flooring options, wind-resistant furniture, container gardening, and design layouts for rooftops of all sizes.
Discover how to fit a functional half circle driveway into a compact front yard. This guide covers layout planning, material selection, landscaping strategies, common mistakes to avoid, and realistic cost estimates for creating an attractive semicircular driveway that improves traffic flow and curb appeal.
Discover practical stock tank pool deck ideas for small backyards. Learn how to build DIY decking, choose materials, add landscaping, and create privacy screens around your galvanized tank pool with expert installation tips and budget-friendly designs.
The content on this website is provided for general informational and educational purposes only. It is intended to explain concepts related to landscape design, outdoor spaces, plants, irrigation, hardscape and softscape, and sustainable landscaping.
All information on this website, including articles, guides, and examples, is presented for general educational purposes. Outcomes may vary depending on local climate, soil, plant selection, and project implementation.
This website does not provide professional design, construction, or horticultural advice, and the information presented should not be used as a substitute for consultation with qualified landscape architects, contractors, or horticulturists.
The website and its authors are not responsible for any errors or omissions, or for any outcomes resulting from decisions made based on the information provided on this website.